Lighting Secrets Revealed: Paul Rogers
Posted on Oct 2, 2017
How do you light the Hilton London Wembley Hotel? Paul Rogers explains his set up…
Words by Jemma Dodd
Paul decided to take his photography hobby more seriously in 2000. Having taken redundancy at his job as a key account manager for Powergen he used the time and money to establish his business. Paul’s work ranges from shooting social events, such as black tie balls to weddings and interiors. In the last few years he has become one of the brand photographers for Hilton and has photographed more than 40 hotels since August last year, ranging across the UK, Eire and the rest of Europe. He also photographs hotels for Melia and Jurys Inns.
“Much of my dusk time work involves moving lights around a scene. Initially I used speedlights, but needed more power, so tried using other types of lights. At the time they generally had a separate power pack with a lead. On more than one occasion (in the darkness) the lead would get tangled around my feet. I rented a Profoto B1 light, which has an integrated battery, hence no trailing lead. It has transformed how I work and made life so much easier,” Paul tells us.
What was this image taken for?
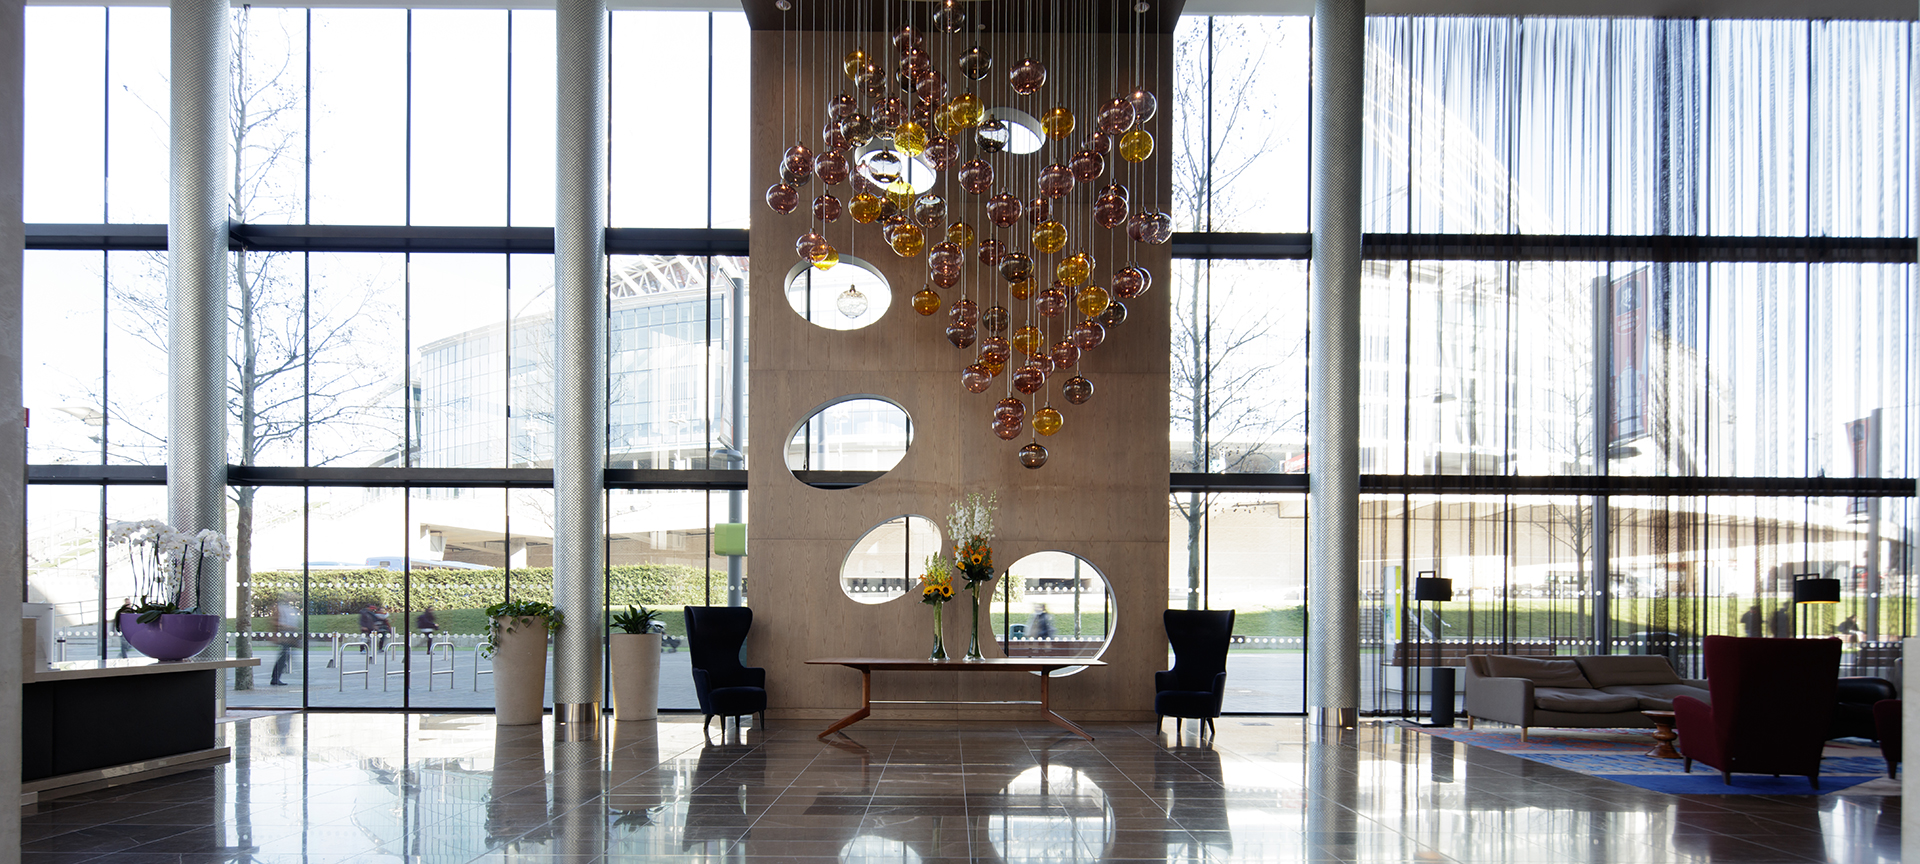
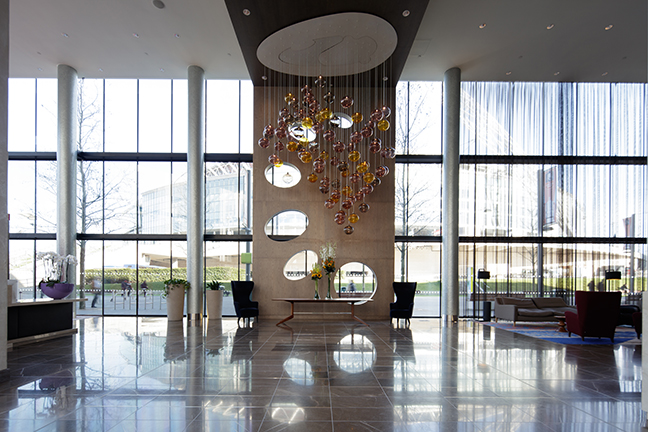
This is the Hilton London Wembley hotel, the image was taken as part of a project for Hilton who were updating the images on their hotel websites. I needed a shot with a correctly exposed exterior light, but at the same time maintaining a good exposure internally. I also needed to be able to show the view of Wembley Stadium and a blue sky outside.
What thoughts did you have about the lighting for this shot?
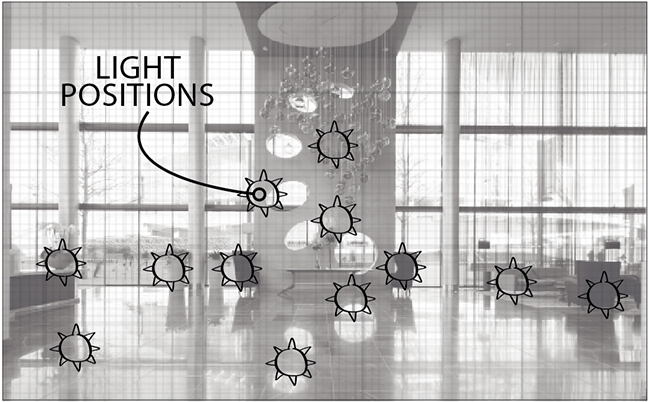
It was a particularly bright day, and the interior lighting was quite subdued. This meant that balancing the internal and external light was a wee bit tricky. I could have added lights around me to balance everything out, however with so much glass in the shot I would have had the problem of glare from the light reflections in the windows. I decided to add individual light effects to different areas, so I walked around the scene with a B1 in my hand lighting up particular areas, for example the flowers, the seating area and the lights.
The Profoto B1 with integrated battery meant that I did not have trailing leads to trip over and I had the added power that I could shoot at ISO 100 and f/11. I shot using a Canon EOS 5DS R with a 17mm tilt-shift lens, Profoto Trigger and a Camranger was used to fire the camera and lights from my iPhone.
How did you know that you’d taken enough shots for the final image?
To some extent there is an element of guesswork involved. Previsualising the shot is vital. I look at the scene and mentally visualise the areas I need to light, and work from one side of the scene to the other, applying light to those areas, often shooting areas multiple times to ensure I have all of the areas covered. I use the Camranger to not only fire the camera and flash remotely, but also to see that the area I have lit is covered and exposed correctly. Even at 100m away from the camera the Camranger sends a low-resolution image of the shot just taken to my iPhone or iPad in my hand. If the area is over- or underexposed, I adjust the light accordingly and shoot again. Likewise, if the area I’m lighting is not completely covered, I move my position and light the portion I missed.
Were there any challenges when lighting this particular shot?
Balancing the interior and exterior lighting to give a natural looking result was one problem, another was that the brand instructions from Hilton required that the shot was devoid of people, so the timing for the job was governed by the lack of guests in the area. The shot was completed within approximately 15 minutes, but there was an hour of preparation and waiting for the area to clear beforehand.
Can you tell us about the editing process?
The final shot was composited in Photoshop and consists of 14 layers. I chose one image and loaded it as a base image as a layer into Photoshop. Then the other images with the areas artificially lit are added as layers on top of the base layer. Each one of the layers is then masked onto the layer below. At the end of the process the final image shows each of the lit layers. Once completed I then export the final image into Lightroom and make final adjustments to tones and cropping. I could do these last adjustments in Photoshop, but I prefer to use Lightroom for the final touches.
See more of Paul’s work at paul-rogers.co.uk
Don’t forget to sign up to receive our newsletter below, and get notified about the new issue, exclusive offers and competitions.
Have you heard The Photography News Podcast? Tune in for news, techniques, advice and much more! Click here to listen for free.


